Monday, April 3, 2017

A Minimalist Work In Progress

My take on minimalism is different from that of a, let’s say, ‘traditional’ minimalist. I loosely follow the ideas behind minimalism - basically, I would select certain aspects of minimalism to follow. It began without me realizing that I was into the lifestyle. Recent years, I have moved at least twice - I would stay in one place at most three or four years and then I would move again.


Last couple of years, during my latest move, I realized that I have a mountain of stuff. Living in the fast-paced and the ever-so-busy city that is New York City, I was engrossed in too many interests and hobbies: fashion (though I have no sense of style, I enjoyed shopping for fast fashion clothing), makeup (Korean makeup & skincare specifically), and finally cosplay. With my geeky tendencies plus an ever growing number of trends in the city - all these things combined created a very efficient consumer. As a good consumer, I was always in the lookout for sales, in-store and online. And I was proud of all the “savings” made after every purchase. And believe me, I would even flaunt those purchases to my coworkers.  It was addictive, like a drug. It felt good to show off the deals I was able to snatch. Alas, I ended up becoming something similar to a hoarder, or more like a trend collector.


As I was organized my stuff and packed them in boxes - I realized something: I have a problem. I have a monstrous amount of things ranging from fast-fashion clothing items, accessories, DVDs, comic books, textbooks, two sewing machines, three large bags of unused fabrics, 5 suitcases full of seasonal clothing, etc. There’s more, but I am already embarrassed to keep count. I questioned myself, I am just one person, living by myself, why do I have so much stuff? I found no answer, but shame. I asked myself why I needed all these things. I don’t necessarily use ALL these things - but just a select few from the multiples that I have collected. Why does one person need all of these things? Can I to use them all?


Finally, I decided to relentlessly sort out my things and let go of the stuff that I never touched in a month. I had to rewire my thought process to questioning myself as I looked through my things: do I need this? Does this make me happy? How often have I been using it? Once I have sorted things into things I need and love, the rest I donated them to friends or charity shops. It was all so simple - let go.

*Though I got a few remarks from my landlady, saying how wasteful I am. Yes, I have to admit - I was wasteful because of the things I bought under the influence of trends. They have already served their purpose in satisfying my temporary interest in them. I was ready to let them go, along with my shame, and "wasted money" (this one was added because of my landlady).

It all makes sense to me now, the things I kept were those that are functional and what sparks joy in me. And that is alright. I do not need the extra stuff, because the more I own, the more it will weigh me down for my next move.


Simply put, minimalism helped me move, and move on easier (quite literal at this point, since we are talking about material stuff I need to move with).

Friday, December 2, 2016

Cruelty-Free Make Up Review: Beyond - Alice in Glow Cushion Limited Set - 02 Vanilla Cake


The Beyond x Disney "Alice in Glow" collection was inspired by afternoon tea party of Alice.

BEYOND Alice In Glow Cushion Limited Set
02 VANILLA CAKE (SPF 50+/PA+++)

Product Brand: Beyond
Line/Collection: Alice in Glow Limited Set
Shade: 02 Vanilla Cake
Volume: 40 ml/ 1.35 fl oz.
Made in Korea

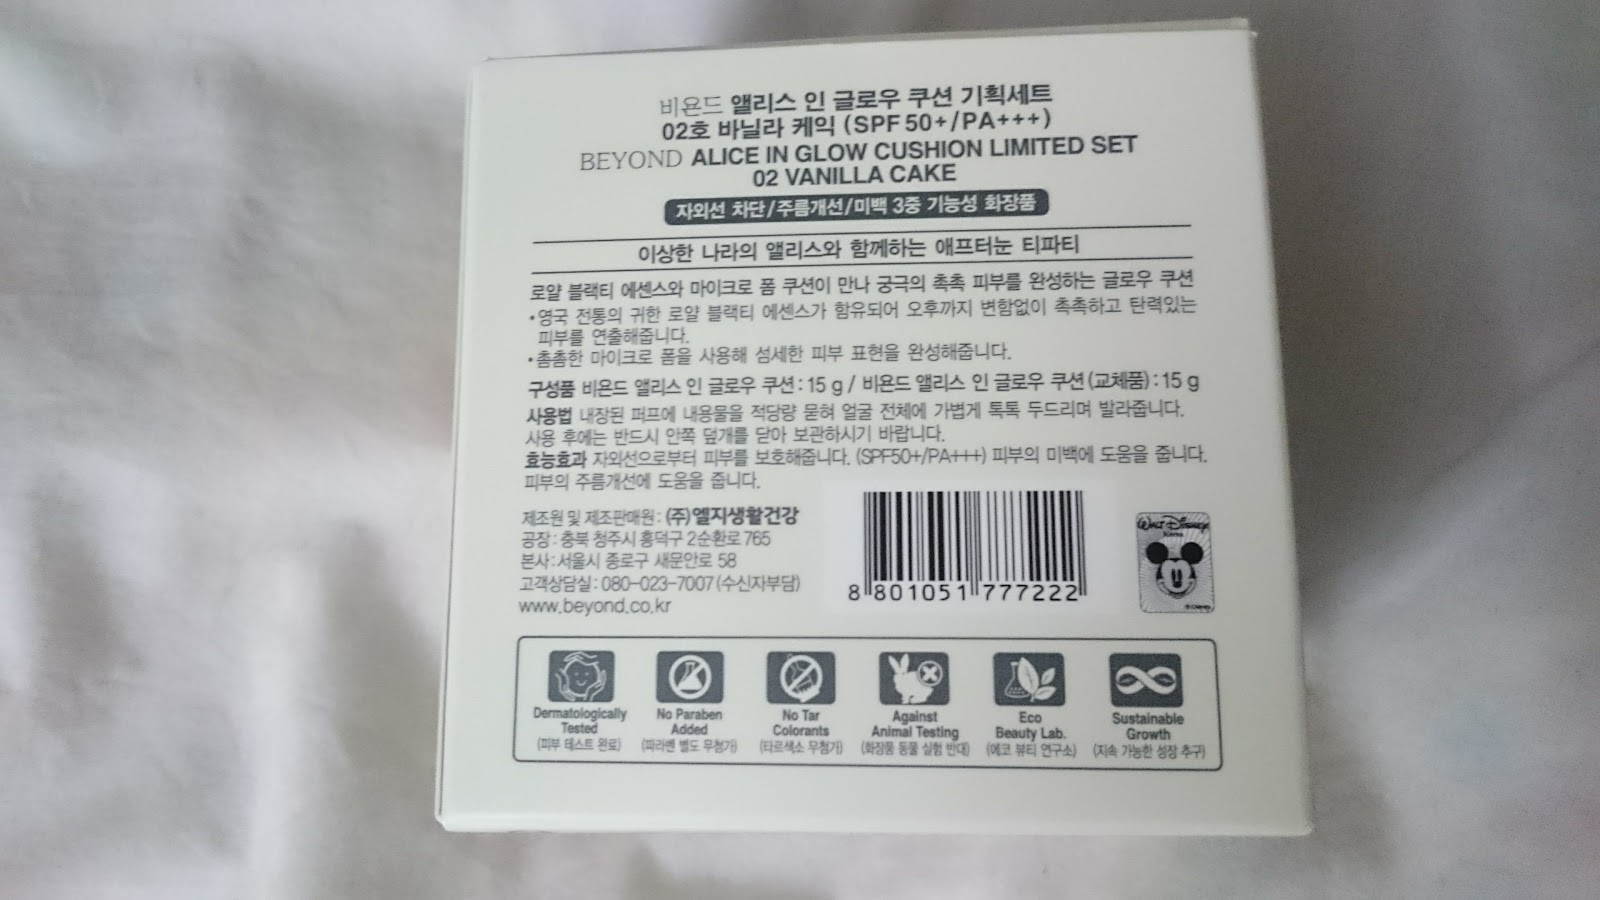
Claims (taken from print on the box packaging):

Glow and moisture cushion maintaining fine skin brightly all day long with micro foam cushion.
  • SPF 50 PA+++
  • Dermatologically Tested 
  • No Paraben Added
  • No Tar Colorants
  • Against Animal Testing
  • Eco Beauty Lab
  • Sustainable Growth
To use: Apply to faces.

Caution: For external use only. Avid contact with eyes. Keep out of reach of children. Discontinue use if signs of irritation and/or rash appear.

Packaging:


My experience with the product:

My skin: combination (oily/dry)
Undertone: warm/neutral
Other: acne prone

I have been using this product for about 5-6 months now. So I was able to test this cushion compact during Summer and Fall/Winter climates. I do not hate this product, but I am not impressed by it either. I purchased this product on eBay, from a seller that ships from Korea. The price was $25 USD, it claims to be a limited edition cushion. It came, as shown in the first photograph, with the compact and a refill cushion.

Pros (things I liked about this product):
  • Light to medium coverage,
  • Dewy finish,
  • My skin did not break out during or after use.
Cons (things I did not like about this product):
  • Feels sticky after application,
  • Very easy to transfer - need to use powder,
  • Moves around - leaves puff marks if you apply in same area twice,
  • Settles on fine lines if my skin is too dry,
  • Too light for my skin tone,
  • Oil control is poor.
Verdict:
  • Will I repurchase the product? No
  • Will I try another product from the same line/collection? No
  • Will I recommend this product? Depends; I would recommend it to those who do not have a lot of issues with their skin. I do not recommend it to those who have dry skin.

I will continue using the product until I finish it because I do not like wasting things; though I will be giving away my refill cushion that it came with. I will be venturing out of Korean products, maybe by my next CF makeup post it will be about a non-Korean brand. Also, I won't be making a purchase of any other makeup until the ones I have are used up. May take a while. So take care, and take care of your loved ones - until next time!

Arelistical rating: 6/10

Sunday, November 27, 2016

NYCC 2016: Thursday


Ta-da! Here you go, full body shot of the airbender nomad costume I made awhile back. I intended to cosplay Jinora, sure the hair is not perfect, but it's close enough! Though everyone kept calling me Aang - how frustrating...

Before I get into details on my experiences this year during NYCC - I will have to point out that I was only able to obtain the Thursday ticket. Though I followed the provided instructions, I fan-registered and followed my specific link at the sale time - I still was not able to buy the weekend pass. I was disappointed. But they offered a second ticket/pass sale again, in which I was able to purchase the Thursday pass.

NYCC 2016 was over months ago - apologies, life happened and I wasn't able to blog much. Before the convention, my friends and I, knowing that we only had one day to raid through the convention - we wanted to get the most out of it, so we decided we should cosplay this year. I was ready - as I have already finished a costume (see prior post). 

My friends, luckily, managed to put something together nicely! One of my friends decided to do an awesome teenage punk version of Kiki (from Studio Ghibli;s 'Kiki's Deliver Service' movie), and I offered to make her bow - I always wanted to cosplay Kiki myself, but this time I needed to debut my airbeder cosplay. It was a chance for me to dust out my sewing machine and review on how to make an awesomely huge and cute bow. It turned out better than I expected and I was so happy she liked it~ I made it with velcro, so that it can attach and detach from a headband ^_~  My other friend decided to comfortably be a Pikachu for the day. 

Courtesy of Ryan Chong at (http://www.rchong3d.com/nycc-2016)
 - Please excuse my unruly caplet... -
We were very happy with how the costume turned out and convention goers recognized the characters we were cosplaying... Well, except, I was mainly confused with my character's grandfather, Avatar Aang. Like, ugh, where do you see arrow tattoos? my head was full of HAIR! *in despair* ;^; Ever heard of other air nomads from the show?!.... Ahem! Anyway, my friend who cosplayed Kiki was very popular :3 she was so aduuuraburuuu as Kiki!! 

While on our rounds in the showfloor, we found a Sokka cosplayer and Aang cosplayer - you can check those photos at IG - same handlename as here.

I wanted to be a princess too, so I put on my tiara and stood next to Sailormoon
We tried to do the most we could, though we mainly went to areas of our interests, which is the show floor (for anime related stuff like Bandai, Viz media, Konami, etc.) and the visited the autographing floor (basement) for a bit. We all agreed not to attend any panels because those mostly require time to line up early to secure a spot - so we did without - and we still had an awesome time during the convention. It was great, even for only one day. I didn't expect to have enjoyed much more than I originally thought because I am so used to attending the entire weekend.

Cosplaying played a huge role in us enjoying the convention this year. So guys, if you are planning to go to any comic-con or anime convention, consider cosplaying something! It will enhance your con-going experience! It definitely did for me. It reminded me the good old days when I used to be more into the hobby.

See you next year NYCC.

That is it, hasta la vista! 

Thursday, June 16, 2016

Cruelty-Free Make Up Review: Beyond Angel Aqua Moisture BB Cream

Ever since this year started, I wanted to do some changes. There are definitely a lot of things I wanted to do and change.One of the changes being switching to cruelty free and environmentally friendly makeup products.

The journey started this January, with some decision making and research. As you can probably tell from the title, I picked up a BB cream. Since my late teens I have been using BB cream and stuck with it - because of the added benefits to the skin aside from covering imperfections.  Also, they do not require much tools for application, some can build up, and usually can adjust to your skin tone. It's a multipurpose product - I love multipurpose! Anyway, you probably already got the idea I like BB creams over traditional foundation makeup - now, let's get on with my impressions with this product!


Product Brand: Beyond
Line: Angel Aqua - Moisture BB
Shade: 02 Natural
Volume: 40 ml/ 1.35 fl oz.
Made in Korea

Claims (taken from print on the box packaging - only the English portions anyways):

  • Chemical Preservatives FREE
  • Ethanol FREEreview
  • Tar Colorants FREE
  • Mineral Oil FREE
  • Animal Origin Ingredients FREE
  • Fragrance FREE
  • SPF 20 PA++
  • 65% Water Contents
  • Dermatologically Tested 
  • No Paraben Added
  • Minimum Chemical Colorants
  • Against Animal Testing
  • Recyclable Package 

During my research on cruelty free Korean BB creams, I did not stumble to a lot of choices, sadly. The search was tough as not many Korean BB creams are cruelty free. I was able to identify a few that I think I would like to try in the future, besides the brand Beyond, that are more accessible, like Lineage, ARITAUM, and IOPE. I was able to find out more about the specifics via this blog post by Kira on Medium (https://medium.com/@givemecorgisordeath/cruelty-free-korean-beauty-9f162cfa7a6b#.x81xq4he4) Check out the post - there is a table where you can read up the brands that are cruelty free and more.

Unfortunately, I could hardly find much of the non-animal ingredient ones that was accessible near me - or even eBay. I was able, however, to find this brand, Beyond, on eBay. There wasn't many seller who carry this product. From all the claims (above), it made me very excited to try this.

Packaging:

  • Simplistic and light design, cute light blue color. Made of recyclable material. 
  • Squeeze tube bottle with pump! Love the pump - easy way to dispense the product. 


My experience with the product:


Pros:
  • Packaging/product dispense with pump - easy to dispense product and hygienic,
  • Recyclable bottle and box,
  • BB cream is easy to blend, 
  • Light to medium coverage,
  • Build-able coverage,
  • Dewy finish,
  • My skin did not break out during or after use so far.

Cons:
  • Cakes up or makes skin flaky,
  • Dries my skin,
  • Feels sticky after application,
  • Settles in fine lines,
  • Easy to transfer - need to use powder,
  • Too light for my skin tone,
  • Oil control is poor.
Well, this is what I have to say about this product regarding my experiences based on 4-5 months use. I am trying very hard to like this product, really; I even try adding Jojoba oil to add more moisture and fix the flakiness. It slightly remedied the problem, not a big change. I am not planning to repurchase it because of how unnatural it looks afterwards, once it starts to flake. It's disappointing, but this is only the beginning - just my first cruelty-free product. Once I am done using this product, I'll go back to research other Korean BB/CC cream brands. 

I like this brand and everything it stands for - just this product did not meet my needs for a BB cream. I may try their other products, probably the CC cream from this line. I only found one review on it - looks good, but it doesn't have the pump, sigh. 

Arelistical rating: 6/10

Sunday, March 6, 2016

Cosplay Progress: Avatar/Legend of Korra: Air bender/nomad Costume

As a follow up from my last post about a month and a half ago - I have finally finished the Airberder/nomad costume! I was so happy with the results.

Trying to do the tree pose but failed because I was falling while taking a picture.
Fabric choices: *Please bear in mind that decisions on my fabric purchases may be due to limited color choices or fabric quality* Another thing I would always consider is when I plan to wear the costume (e.g. fall, spring, summer, etc)

Orange (cape/sash/cuff) - I went with a medium heavy cotton blend, I believe I bought it as a white fabric and dyed it into the desired orange color. The reason why I would decided to custom dye my fabrics is usually due to the lack of fabric color choices that did not meet my desired color shade/tones; or maybe the color I needed did not offer the quality I look for. Tip: always go for a lighter color or white fabric to custom dye your fabric.

Yellow (top/trousers) - Not very sure of the name of the fabric but it feels like a satin and cotton blend - no stretch. Though I wish the yellow fabric did have some stretch because it was somewhat difficult to wear, especially trying to fit my head through the collar. Overall it was easy to work with and the weight and quality of the fabric met my needs. 

Maroon - I purchased a pair of tights. Particularly thick tights with some lining inside. That is because I am planning to wear it during the fall - when I usually go to NYCC. More often than not, it is chilly if not windy cold. 


How to make an airbender/air nomad costume: 
*Offering advise/suggestions - you must know have some experience or some knowledge of sewing and sewing pattern drafting*

TOP: Use your favorite long sleeve top, whichever fits you a bit loose, and trace your pattern. For cuffs, I decided that I wanted slits on the sleeves and sew piping around it to seal it then attached a rectangle along the brim of the sleeves as cuffs.  Or you can try using a button up shirt sewing pattern with long sleeves, they usually have instructions on how to sew a cuff with slits. Add eye and hook to secure/close the cuff for the final look.


Trousers: Before you trace your pattern on this one, make sure how you want your trousers to look. For me, I did not want a seam along my crotch area nor along my bottoms area - so I decided to make a front and back pieces for these pants, as opposed to the usual four pieces pattern for pants. Use your favorite pair of sweatpants or PJ pants pattern and trace a pattern. Make a front piece and a back piece, then carefully trace a curve along the crotch area for both front and back. Once you sew the pants, do not join the crotch area, just hem along. 

Around the leg-end of the trousers, that is where you will sew close as normal and if you want to use elastic to make that puffy effect you may, or you can use a ribbon or rope instead if you do not have elastic - just make sure to leave an open area to tie the strings to secure them.

Sash: decide how long and wide you want your sash; make a long rectangle and sew along - making a tube. Flip right side out and top stitch if you want.

Cape: use a cape pattern - just trace your own pattern shorter - once you have sewn the pieces to make your cape, if you wanted to add details like I did - the two sleeve things along the sides of the cape. All I did was to sew a tubing and fed elastic inside to secure the cape in place (as how it is show in the cartoon) and attach it along the cape on the sides that met my arms.


And to secure the cape, I sew a hook and eye, as shown below:


And finally for the shoes, I purchased the on eBay (of course!) and spray painted the shoes with shoe brown spray paint. The shoes I went with a pair of flat ballerina shoes, the link below directs you to where I bought the shoes: http://www.ebay.com/itm/131641455634?_trksid=p2057872.m2749.l2649&ssPageName=STRK%3AMEBIDX%3AIT


Phew! This is all so far, its been tough, since I am somewhat slow with sewing now that I am not as active as before. But all what is left is to get the right wig and it will be complete. Oh, yes, I am planning to cosplay Jinora from Legend of Korra

Hope this gave you some idea how to construct and put together your own air nomad costume! Anyway, have fun! Do drop me a comment if you have any questions and/or show me your work in progress~ I would love to see how yours turn out!